HOW TO GET THE SELECTED ITEM(S) IN A LIST VIEW CONTROL ListView returns collections of selected items and indices through the SelectedItems and SelectedIndices properties. Note that these collections are empty, if no item is currently selected( lst.SelectedItems.Count == 0).The first item that is selected is lst.SelectedItems[0]The index of this item in the Items collection islst.SelectedIndices[0].So basically CheckBoxes to true for this. Through the CheckedItems and CheckedIndices properties you can see which items are checked. |
Saturday, February 2, 2013
HOW TO GET THE SELECTED ITEM(S) IN A LIST VIEW CONTROL
KEYPRESS EVENT IN VB.NET
Handle Keyboard Input at the Form Level in VB.NET
Windows Forms processes keyboard input by raising
keyboard events in response to Windows messages. Most Windows Forms
programs process keyboard input by handling the keyboard events.
How do I detect keys pressed in VB.NET
You can detect most physical key presses by handling the KeyDown or KeyUp events. Key events occur in the following order:
  KeyDown
  KeyPress

  KeyUp
How to detect when the Enter Key Pressed in VB.NET
The following VB.NET code behind creates the
KeyDown event handler. If the key that is pressed is the Enter key, a
MessegeBox will displayed .
  If e.KeyCode = Keys.Enter Then
 MsgBox("enter key pressd ")

End If
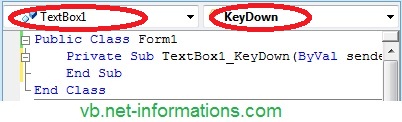
How to get TextBox1_KeyDown event in your VB.Net source file ?
Select your VB.Net source code view in Visual
Studio and select TextBox1 from the top-left Combobox and select KeyDown
from top-right combobox , then you will get keydown event sub-routine
in your source code editor.
  Private Sub TextBox1_KeyDown(...)..

End Sub
The following VB.NET source code shows how to capture Enter KeyDown event from a TextBox Control.
How to: Print a Form by Using the PrintForm Component (Visual Basic)
The PrintForm component enables you to quickly print an image of a form exactly as it appears on screen without using a PrintDocument
component. The following procedures show how to print a form to a
printer, to a print preview window, and to an Encapsulated PostScript
file.
To print a form to the default printer
-
In the Toolbox, click the Visual Basic PowerPacks tab and then drag the PrintForm component onto the form.
The PrintForm component is added to the component tray.
-
In the Properties window, set the PrintAction property to PrintToPrinter.
-
Add the following code in the appropriate event handler (for example, in the Click event handler for a Print Button).
PrintForm1.Print()
To display a form in a print preview window
-
In the Toolbox, click the Visual Basic PowerPacks tab and then drag the PrintForm component onto the form.
The PrintForm component is added to the component tray.
-
In the Properties window, set the PrintAction property to PrintToPreview.
-
Add the following code in the appropriate event handler (for example, in the Click event handler for a Print Button).
PrintForm1.Print()
To print a form to a file
-
In the Toolbox, click the Visual Basic PowerPacks tab and then drag the PrintForm component onto the form.
The PrintForm component is added to the component tray.
-
In the Properties window, set the PrintAction property to PrintToFile.
-
Optionally, select the PrintFileName property and type the full path and file name for the destination file.
If you skip this step, the user will be prompted for a file name at run time.
-
Add the following code in the appropriate event handler (for example, in the Click event handler for a Print Button).
Saturday, January 5, 2013
KEYPRESS EVENT IN VB.NET
Handle Keyboard Input at the Form Level in VB.NET
Windows Forms processes keyboard input by raising
keyboard events in response to Windows messages. Most Windows Forms
programs process keyboard input by handling the keyboard events.
How do I detect keys pressed in VB.NET
You can detect most physical key presses by handling the KeyDown or KeyUp events. Key events occur in the following order:
KeyDown KeyPressKeyUp
Note: Before a form can capture its key-related events, its keyPreview property MUST be set to TRUE
How to detect when the Enter Key Pressed in VB.NET
The following VB.NET code behind creates the
KeyDown event handler. If the key that is pressed is the Enter key, a
MessegeBox will displayed .
  If e.KeyCode = Keys.Enter Then
 MsgBox("enter key pressd ")

  End If
How to get TextBox1_KeyDown event in your VB.Net source file ?
Select your VB.Net source code view in Visual
Studio and select TextBox1 from the top-left Combobox and select KeyDown
from top-right combobox , then you will get keydown event sub-routine
in your source code editor.
Private Sub TextBox1_KeyDown(...)..End Sub
Friday, January 4, 2013
ADD, EDIT OR UPDATE A DATABASE
Before we start the coding for these new buttons, it's important to understand that the DataSet is disconnected from the database. What this means is that if you're adding a new record, you're not adding it to the database: you're adding it to the DataSet! Similarly, if you're updating or Deleting, you doing it to the DataSet, and NOT to the database. After you have made all of your changes, you THEN commit these changes to the database. You do this by issuing a separate command. But we'll see how it all works.
You'll need to add a few more buttons to your form - five of them. Change the Name properties of the new Buttons to the following:
btnAddNew
btnCommit
btnUpdate
btnDelete
btnClear
btnCommit
btnUpdate
btnDelete
btnClear

We'll start with the Update Record button
Updating a Record
To reference a particular column (item) in a row of the DataSet, the code is this:
ds.Tables("AddressBook").Rows(2).Item(1)
As well as returning a value, you can also set a value. You do it like this:
ds.Tables("AddressBook").Rows(2).Item(1) = "Jane"
ds.Tables("AddressBook").Rows(inc).Item(1) = txtFirstName.Text
ds.Tables("AddressBook").Rows(inc).Item(2) = txtSurname.Text
ds.Tables("AddressBook").Rows(inc).Item(2) = txtSurname.Text
MsgBox("Data updated")
Move to the next record by clicking your Next Record button, and then move back to the first record. You should see that the first record is now "Joan Smithy".
Close down your programme, then run it again. Click the Next Record button to move to the first record. It will still be "John Smith". The data you updated has been lost! So here, again, is why:
"Changes are made to the DataSet, and NOT to the Database"
Dim cb As New OleDb.OleDbCommandBuilder(da)
ds.Tables("AddressBook").Rows(inc).Item(1) = txtFirstName.Text
ds.Tables("AddressBook").Rows(inc).Item(2) = txtSurname.Text
ds.Tables("AddressBook").Rows(inc).Item(2) = txtSurname.Text
da.Update(ds, "AddressBook")
MsgBox("Data updated")
Dim cb As New OleDb.OleDbCommandBuilder(da)
The second new line is where the action is:
da.Update(ds, "AddressBook")
But the Data Adapter will then contact the database. Because we have a Command Builder, the Data Adapter can then update your database with the values from the DataSet.
Without the Command Builder, though, the Data Adapter can't do it's job. Try this. Comment out the Command Builder line (put a single quote before the "D" of Dim). Run your programme again, and then try and update a record. You'll get this error message:

The error is because you haven't got a command builder - a Valid Update Command.
Delete the comment from your Command Builder line and the error message goes away.
You should now be able to make changes to the database itself (as long as the Access database isn't Read Only).
Try it out. Run your programme, and change one of the records. Click the Update button. Then close the programme down, and load it up again. You should see your new changes displayed in the textboxes.
More tutorials like this at http://www.homeandlearn.co.uk
Friday, December 28, 2012
HOW TO CONNECT TO AN ACCESS (*.mdb OR *.accdb DATABASE IN VB.NET
Connecting to a database in .net could be a bit tricky to programmers of vb 6.0 and vb(a) who are already used to recordsets and the JET engine.
However, it is quite simple if you keep the following concepts in mind.
Data Connection
This provides a connection to your database. For the purpose of our example, we would use an oledb provider. Declare a variable as part of the oledb.oledbconnection method as follows:
Dim DBConn As New OleDb.OleDbConnection
Where DBConn is our connection variable.
We can now assign a connection string value to our connection object by:
.ConnectionString = "Provider=Microsoft.ACE.OLEDB.12.0;Data Source=" & _
My.Application.Info.DirectoryPath & _
"\Database\test1.accdb;Persist Security Info=False;"
.Open()
Assuming our database is named test1.accdb and is located in a folder named database in the same folder as the application is located.
Command Object
This object is used to store SQL commands needed to specify requests to our database. It is declared as
Dim cmdSQL As New OleDb.OleDbCommand
where cmdSQL is any variable of your choice. The three main properties to specify in an Oledb Command object is its connection, command type and command text.
cmdSQL.Connection = DBConn
cmdSQL.CommandText = "SELECT * FROM YourTable"
cmdSQL.CommandType = CommandType.Text
Data Adapter
This serves as a go-between to your dataset and connection string. it is declared similar to your connection object as
Dim DatAdapter As New OleDb.OleDbDataAdapter(cmdSQL)
DataSet
This is similar to a recordset and is an in-memory representation of the requested table from the database.
it is declared as:
Dim DatSet As New DataSet
The dataset is filled using the fill method of the data adapter by
DatAdapter .Fill(DatSet)
so that the whole code look like this:
Public Sub OpenDbConn()
Dim DBConn As New OleDb.OleDbConnection
Dim cmdSQL As New OleDb.OleDbCommand
Dim DatAdapter As New OleDb.OleDbDataAdapter(cmdSQL)
Dim DatSet As New DataSet
With DBConn
.ConnectionString = "Provider=Microsoft.ACE.OLEDB.12.0;Data Source=" & _
My.Application.Info.DirectoryPath & "\Database\test1.accdb;Persist Security Info=False;"
.Open()
End With
If DBConn.State = ConnectionState.Open Then
With cmdSQL
.Connection = DBConn
.CommandText = "SELECT * FROM YourTable"
.CommandType = CommandType.Text
End With
With DatAdapter
.Fill(DatSet)
End With
End If
End Sub
Subscribe to:
Posts (Atom)